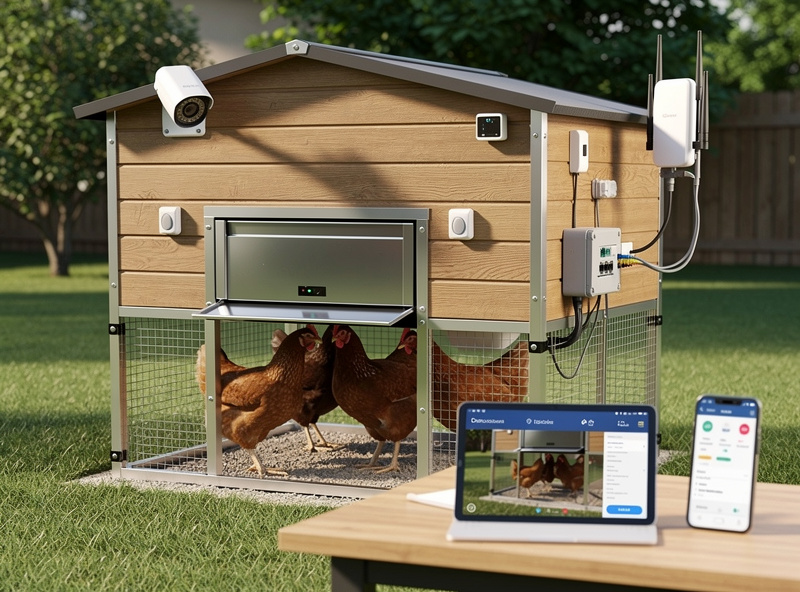
One outdoor PoE access point, one buried Cat6 run, one VLAN — about $130-140 covers a 150-foot radius of 2.4 GHz Wi-Fi for coop sensors, a door, and a camera. The mistake I made before the VLAN went in comes in section two.
The reason the radius lands at 150 feet and the bill lands at $120 is the same architecture I already ran indoors: an IoT VLAN on the home firewall, extended outdoors over a single buried run with PoE delivering power and data on the same cable. The outdoor environment adds three constraints indoor networking never has to think about — direct-burial jacket rating, lightning protection at the house entry, and 6–18 inch burial depth depending on what is over the trench. In my setup the home network already has an IoT VLAN for indoor smart plugs and cameras; extending that VLAN about 80 feet to the coop is one buried Ethernet cable, one outdoor PoE access point, and one firewall rule that isolates coop traffic from the rest of the LAN. This article covers the network layer — cabling, VLAN, access point placement, firewall rules. The coop-specific hardware (sensors, door controller, camera) lives on smartcoophq.com’s complete smart coop build guide, where the device selection and automation logic are covered in detail.

What Outdoor Cable Survives 5+ Years in a Buried Coop Run?
Outdoor Ethernet for a coop network needs three things indoor cable does not: direct-burial rating, UV-resistant jacket, and a burial depth of at least 6 inches — 18 inches if it runs under a driveway or path where digging might happen. That 18-inch number is not arbitrary: NEC NFPA 70 Article 300.5 lists the minimum cover for direct-buried non-metallic communications cable, and the same table is what every electrician working a low-voltage trench works from. Cable runs are also bounded by TIA-568.2-D, which caps a Category 6 horizontal channel at 100 meters end-to-end and specifies the jacket and connector requirements for outdoor and burial environments — the standard most installer manuals quote when they say “330 feet max.”
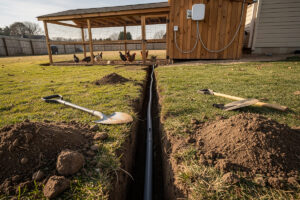
My first run on this property broke both rules. I buried standard indoor Cat6 in soil at about 4 inches because I was in a hurry to test the link before winter. It worked for 18 months. Then the second freeze-thaw cycle on the Swedish ground cracked the gel-filled jackets right at the frost line, water wicked into the conductor bundle, and the link started dropping every time the temperature crossed zero. Pulled the whole 80-foot run, replaced it with direct-burial UV-jacketed Cat6 at 8 inches in a sand bed. Lesson: indoor PVC jacket and indoor depth do not survive a single Northern winter, no matter what the spec sheet says about “outdoor-capable.” Outdoor-rated Cat6 with a gel-filled core or polyethylene jacket costs about $0.30 per foot and lasts 10–15 years underground if you give it the depth.
The cable run from the house to the coop follows the same path as any outdoor low-voltage wiring. I have the route planned for the new install: out through the basement wall via an existing cable penetration, along the foundation for 20 feet, then a straight 60-foot trench to the coop. The trench is 8 inches deep this time, and the cable sits in 1/2-inch PVC conduit for the first 10 feet where it exits the house — the conduit protects against weed-whacker strikes and rodent chewing where the cable is most exposed. Beyond 10 feet, the cable runs in direct soil because conduit for the full 80-foot run adds about $40 of PVC and 2 hours of work for minimal additional protection. Direct-burial cable in undisturbed soil at proper depth survives as long as conduit-protected cable at the same depth.
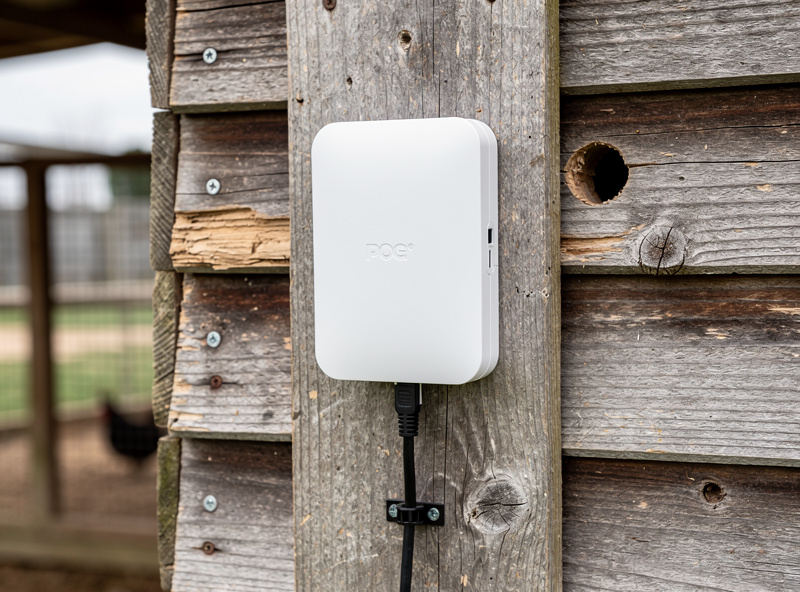
PoE (Power over Ethernet) is what makes this work on one cable. IEEE 802.3at (PoE+) specifies up to 25.5 W of delivered power per port, which is the headroom behind every “15–30 W PoE budget” claim for outdoor access points and PTZ cameras — at 802.3at the switch can run a pair of devices on a single Cat6 with no separate electrical feed. I run a TP-Link EAP225-Outdoor on this coop link because the IP65 housing has held up through two Swedish winters without water ingress, and at $40 it costs less than a single Ubiquiti UniFi AC Mesh unit ($90) while delivering the same 2.4 GHz coverage I need for low-bandwidth coop sensors. If I were building a denser farmyard mesh I would step up to the UniFi AC Mesh because the controller pairing across multiple outdoor APs is cleaner than TP-Link’s Omada equivalent — but for a single coop AP, the EAP225 wins on price. One cable, one access point, one SSID — the entire farm-side network in a single afternoon of trenching.
VLAN Isolation: Why the Coop Gets Its Own Network
The coop devices go on a dedicated VLAN tagged with a separate subnet — 192.168.30.0/24 in my plan — that has two firewall rules:
- Allow established/related traffic from the LAN to the IoT VLAN. This lets me reach the coop camera and sensor dashboards from my phone on the main LAN, but only for connections I initiated.
- Block all new traffic from the IoT VLAN to the LAN. If a coop camera gets compromised — and cheap IP cameras are the most compromised devices on the internet — the attacker cannot reach the main LAN. They are trapped in the IoT VLAN with nothing to pivot to except other coop devices.
This is the same VLAN topology I run for indoor smart-home devices. The outdoor location does not change the firewall logic — it changes the threat model. Outdoor devices are physically accessible to anyone who walks up to the coop, which means someone could unplug the camera and plug in a laptop. The “block all new traffic from the IoT VLAN to the LAN” rule prevents that laptop from reaching anything inside the house, even if the attacker has physical access to the outdoor Ethernet port. This is why I have switch-port security and MAC address filtering enabled on the switch port that feeds the outdoor access point — if the switch sees a new MAC address on that port, it shuts the port down and sends me an alert. I run a used Cisco SG200-08P (about $40-50 on eBay) for this because it does 802.1Q VLAN tagging, actually sources PoE out of 4 of its 8 ports (32W total budget — enough for one outdoor AP plus an indoor device), and 802.1X port security in a single box that has been on my rack for four years without a reboot (Cisco SG200-08P datasheet). Worth flagging: an HP ProCurve 1810G looks like the same category of end-of-life enterprise gear for hobby money, but it is only a PoE powered device on port 1 — it cannot source PoE to downstream APs or cameras, so it is not a substitute here unless you are feeding it power, not delivering power to the AP.
What I’d Do If Starting Today
If I were running this trench fresh this spring, the bill of materials is short and the choices are easy. Cable: direct-burial UV-jacketed Cat6, 100 feet, about $30 — not indoor PVC, not any depth shallower than 8 inches in a freeze-thaw climate. Access point: TP-Link EAP225-Outdoor at $40 for a single-AP coop, UniFi AC Mesh at $90 if you plan to grow to a mesh of two or three outdoor APs around outbuildings. Switch: a used Cisco SG200-08P for $40-50, because VLAN tagging plus actual PoE-out plus port security in one box is what makes the rest of this design work — a plain used HP ProCurve 1810G looks similar on paper but cannot source PoE to an AP, so confirm PoE-out capability before buying whatever’s cheapest on eBay. Add a $15 gas-discharge Ethernet surge protector at the house entry, sized for Cat6, grounded to the same bond point your electrical panel uses. That is the whole network layer. Once the cable, AP, and VLAN are stable, the device-selection side — which coop sensors, which door controller, which camera, how they pair with Home Assistant — is the next decision, and that lives on smartcoophq.com’s smart coop build guide.
Frequently Asked Questions
How far can I run Ethernet to a chicken coop?
330 feet (100 meters) is the TIA-568.2-D maximum Cat6 horizontal channel length for reliable gigabit. A typical backyard coop is 50–150 feet from the house, well within spec. In my setup the coop sits 80 feet out and the link runs at full gigabit. For distances beyond 330 feet, use fiber optic cable with media converters at each end — fiber is immune to lightning and ground-potential differences that copper Ethernet cannot handle over long outdoor runs.
Do I need a separate internet connection for the coop network?
No. The coop network is a VLAN on your existing home network, extended through a buried Ethernet cable. The coop devices share the same internet connection as the house. A separate internet connection for a coop would cost 50–80 dollars per month for no benefit — the data usage of a few sensors and a camera is negligible. In my plan the entire coop draws under 50 MB per day.
What happens to the coop network during a power outage?
A PoE switch on a UPS in the house keeps the outdoor access point and coop devices running for 30–90 minutes during an outage, depending on UPS capacity. If the coop has its own battery backup for the automated door, the network layer should share that UPS or have its own small battery. A 12V PoE injector powered by the coop solar battery keeps the access point running indefinitely during extended outages — that is the failover I have wired into my plan.
Can I use a Wi-Fi mesh system instead of burying cable?
A point-to-point wireless bridge using two Ubiquiti Nanostation or similar outdoor radios can replace the buried cable with a 150 Mbps wireless link for about 120 dollars. The buried cable I prefer is cheaper (40 dollars for 100 feet of outdoor Cat6), faster (1 Gbps vs 150 Mbps), and more reliable (no rain fade, no alignment drift). Bury the cable if the distance is under 300 feet.
How do I protect outdoor Ethernet from lightning?
Install an Ethernet surge protector at the point where the cable enters the house — a 15-dollar gas-discharge-tube protector mounted to a grounded electrical panel. This shunts induced lightning current to ground before it reaches the switch. The protector I run is bonded to the same ground my main panel uses, per NEC. No consumer surge protector survives a direct lightning strike to the cable — the protector reduces induced-surge damage, not direct-strike damage.
What is the cheapest way to set up a coop IoT VLAN?
A used managed switch with VLAN support and real PoE-out costs 40 to 50 dollars on eBay (Cisco SG200-08P is what I run – confirm any HP ProCurve 1810 you find is only a PoE powered device, not a PoE source, before relying on it to power an AP), an outdoor PoE access point costs 40 to 60 dollars (TP-Link EAP225-Outdoor is my pick), and 100 feet of outdoor Cat6 cable costs 30 dollars. Total hardware bill is under 140 dollars. The VLAN configuration takes about 20 minutes in the switch web interface or OPNsense firewall.
Related Articles
- pfSense Firewall Rules for Beginners: Complete Guide
- pfSense Configuration Guide: Complete Setup
- OPNsense Firewall Rules: Complete Guide
- Wi-Fi 6 for Smart Homes: Why Mesh Networks Beat Boosters
- Sizing a UPS for Your Home Network: From Single Router to Full Rack