From Simple Router to Full Network Stack
Theory and individual features come together in complete network builds. These five progressive examples demonstrate how the concepts from other guides combine into functioning networks. Each build increases in complexity, adding capabilities while building upon previous foundations. Whether you want a basic replacement for a consumer router or a sophisticated multi-site infrastructure, these real-world examples provide concrete implementation guidance.
Every build includes hardware specifications, software configuration highlights, network topology, and lessons learned. Use these as starting points for your own designs, modifying based on your specific requirements and constraints.
Build 1: Basic Single Router Setup
Overview
The foundational build replaces a consumer router with a DIY solution. Simple, reliable, and significantly more capable than typical home equipment. Perfect for first-time builders wanting improved performance without overwhelming complexity.
Hardware
- Router: Used thin client (HP T620) or budget mini PC ($80-150)
- Processor: AMD GX-420CA or Intel J3455 (quad-core with AES-NI)
- RAM: 4 GB DDR3
- Storage: 32 GB SSD
- Networking: Built-in Gigabit Ethernet + USB 3.0 Gigabit adapter
- Power: 10-15 watts
Software Configuration
Platform: OPNsense (user-friendly for beginners) or pfSense
Configuration Highlights:
- WAN interface: DHCP from ISP modem
- LAN interface: 192.168.1.1/24 with DHCP server (100-200 range)
- Basic firewall: Allow all outbound, deny unsolicited inbound
- DNS: Forward to Cloudflare 1.1.1.1 and 1.0.0.1
- Port forwarding: Configured as needed for gaming or services
Network Topology
Internet → ISP Modem → [DIY Router] → Switch/AP → Devices
                      192.168.1.1
Performance
- Gigabit routing: Full line rate achieved
- VPN: 200-300 Mbps WireGuard (processor limited but adequate)
- Device capacity: 30-50 devices without strain
- Latency: <1ms local, minimal overhead
Cost
- Hardware: $80-150 (used thin client)
- Software: Free
- Total: Under $150
Lessons Learned
USB Ethernet Reliability: Early builds used cheap USB Ethernet adapters causing intermittent issues. Invest in quality adapters with good chipsets (ASIX AX88179 or Realtek RTL8153 minimum).
ISP Modem Configuration: Spent two hours troubleshooting before realizing ISP modem was routing (double NAT). Setting modem to bridge mode solved all port forwarding and gaming issues immediately.
Power Supply Quality: Original cheap replacement power supply caused random reboots. OEM power supply resolved instability completely.
Who This Suits
First-time builders, apartments and small homes, users wanting better reliability than consumer routers without complexity, tight budgets.
Build 2: Router with Managed Switch and VLANs
Overview
Adds network segmentation to separate device categories. IoT devices, trusted computers, and guest devices each have isolated networks with controlled interconnection. Demonstrates VLAN fundamentals applicable to larger environments.
Hardware
- Router: Mini PC with dual Intel NICs ($200-300)
- Switch: 8-port managed Gigabit switch ($60-100)
- Access Point: Ubiquiti UniFi or TP-Link Omada ($100-150)
- Total Power: 25-30 watts
Software Configuration
Platform: OPNsense or pfSense
VLAN Architecture:
- VLAN 10 (Trusted): 192.168.10.0/24 – Personal devices, full access
- VLAN 20 (IoT): 192.168.20.0/24 – Smart home devices, internet only
- VLAN 30 (Guest): 192.168.30.0/24 – Visitor devices, isolated
- VLAN 40 (Management): 192.168.40.0/24 – Admin access
Firewall Rules:
- Trusted can initiate connections to IoT (for management)
- IoT cannot initiate to Trusted (security containment)
- Guest has internet only, no access to other VLANs
- Management VLAN restricts administrative access
Network Topology
Internet → Modem → [Router] → [Managed Switch]
                                    |
           +------------------------+--------+--------+--------+
           |                        |        |        |        |
        VLAN 10                  VLAN 20  VLAN 30  VLAN 40  Trunk to AP
      (Trusted)                  (IoT)    (Guest)  (Mgmt)
Physical Cabling
- Router LAN → Switch Port 1 (trunk, all VLANs)
- Switch Port 2-4: VLAN 10 (computers, NAS)
- Switch Port 5-6: VLAN 20 (IoT devices)
- Switch Port 7: VLAN 30 (guest AP)
- Switch Port 8: Trunk to main AP (multiple SSIDs)
Access Point Configuration
Main AP broadcasts three SSIDs:
- Home: VLAN 10 (trusted devices)
- Home-IoT: VLAN 20 (smart devices only)
- Home-Guest: VLAN 30 (guests, isolated)
Performance
- Inter-VLAN routing: Wire speed (Gigabit)
- Device capacity: 50-100 devices across VLANs
- Security benefit: Compromised IoT device cannot reach computers
Cost
- Router: $250
- Switch: $80
- Access Point: $120
- Total: ~$450
Lessons Learned
VLAN Tagging Confusion: Initially forgot to set AP port as trunk (carrying all VLANs). AP couldn’t reach all networks. Switching port to trunk mode fixed everything.
Firewall Rule Direction: Spent hours troubleshooting why IoT couldn’t reach computers when that was exactly what we wanted. Realized “block” rules were unnecessary; simply not permitting IoT→Trusted was sufficient.
Management VLAN Overkill: For home use, dedicated management VLAN added complexity without benefit. Simplified by just restricting admin interface to LAN subnet.
Who This Suits
Smart home owners with many IoT devices, privacy-conscious users, those wanting to segment networks, learners preparing for enterprise networking.
Build 3: Adding Dedicated Wireless Access Point
Overview
Separates routing from wireless functions. Dedicated access points provide better coverage, more features, and centralized management. This professional approach scales to multiple APs for larger homes. If you are still deciding between a wired-AP layout and a mesh system, the wired access points vs mesh comparison breaks down where each wins on latency, backhaul capacity, and total cost.
Hardware
- Router: Protectli Vault or similar mini PC ($300-400)
- Core Switch: 8-port managed ($80-120)
- Access Point 1: Ceiling-mount WiFi 6 AP ($150-200)
- Access Point 2: Wall-mount for coverage extension ($100-150)
- Controller: Cloud Key or software controller (optional, $100-200)
- Cabling: CAT6 runs to AP locations
- Power: PoE switch or injectors
Software Configuration
Router: OPNsense with advanced features:
- Suricata IDS (monitoring mode initially)
- AdGuard Home for DNS filtering
- WireGuard VPN server
- QoS for video call prioritization
Wireless Controller:
- Centralized SSID management
- Roaming configuration (fast handoff)
- Band steering (push capable devices to 5 GHz)
- Airtime fairness
- Multiple SSIDs with VLAN assignment
Network Topology
Internet → Modem → [Router] → [PoE Switch] → Devices + APs
                |               |
                |           +---+---+---+
                |           |   |   |
            VLAN Trunk    AP1 AP2 AP3
            (Router)    (Main)(Guest)(IoT)
Roaming Configuration
Multiple APs require proper roaming:
- Same SSID on all APs
- Minimum RSSI thresholds (disconnect weak signals)
- Fast roaming (802.11r) for seamless handoff
- Proper channel planning (non-overlapping)
Performance
- WiFi 6 speeds: 800+ Mbps to capable devices
- Seamless roaming: <50ms handoff time
- Coverage: Full home, no dead zones
- Concurrent devices: 100+ across all APs
Cost
- Router: $350
- PoE Switch: $120
- 2× APs: $320
- Cabling/Install: $200
- Total: ~$1000
Lessons Learned
Channel Planning Critical: Initially left APs on auto-channel. They selected overlapping channels, causing interference and poor performance. Manual channel assignment (1/6/11 for 2.4 GHz, non-DFS for 5 GHz) resolved issues.
PoE Budget: First switch lacked sufficient PoE budget for two APs. APs would randomly reboot under load. Upgraded to switch with higher PoE wattage solved instability.
Controller Not Always Necessary: Paid for hardware controller initially. Later discovered software controller on router served same purpose without additional cost. Consider software solutions first.
Who This Suits
Larger homes needing multiple APs, users wanting professional WiFi performance, those planning to expand coverage, remote workers needing reliable connectivity throughout home. For step-by-step adoption, VLAN tagging, and roaming tuning on a UniFi deployment specifically, the UniFi access point setup guide covers the full commissioning workflow from controller to client band steering.
Build 4: Multi-WAN with Failover
Overview
Internet connectivity is critical for modern life. This build adds redundant connections—two ISPs with automatic failover when primary fails. Essential for home offices, businesses, and anyone requiring always-on connectivity.
Hardware
- Router: Powerful mini PC with three NICs ($350-500)
- Processor: Intel i3 or AMD equivalent (handles dual gigabit)
- RAM: 8 GB
- NICs: Three Intel Gigabit ports (WAN1, WAN2, LAN)
- Primary WAN: Cable or fiber (500 Mbps+)
- Backup WAN: DSL, LTE, or secondary fiber (100 Mbps+)
- Switch and APs: From previous builds or equivalent
Software Configuration
Multi-WAN Setup:
- WAN1: Primary connection (cable/fiber, higher speed)
- WAN2: Backup connection (different ISP/technology)
- Gateway groups define failover priorities
- Trigger level: Packet loss or high latency
Failover Configuration:
- Monitor both gateways continuously
- If WAN1 fails (loss >10%, latency >500ms), switch to WAN2
- Sticky connections (maintain existing sessions)
- Revert to WAN1 when stable for 5+ minutes
Load Balancing Option:
- When both connections work, distribute traffic across both
- Weighted by connection speed
- Policy routing for specific devices (gaming PC always on WAN1)
Advanced Features:
- VPN server uses DDNS (dynamic DNS) for consistent hostname
- Outbound NAT rules for each WAN
- Port forwarding duplicated on both WANs or specific to one
- Notifications when failover occurs (email, push)
Network Topology
        +--- Cable Modem (Primary) ---+
        |                              |
Internet+--- DSL Modem (Backup) -------+-- [Router] -- LAN -- Devices
        |                              |    |
        +--- LTE (Emergency) -----------+ Failover Logic
Configuration Highlights
Gateway Monitoring:
- Ping reliable external IPs (8.8.8.8, 1.1.1.1)
- Monitor interval: 1 second
- Loss threshold: 10% over 10 seconds
- Recovery: 60 seconds of stable pings
Sticky Connections:
- Maintain HTTPS sessions through same WAN
- Prevent session breaks during failover
- Timeout: 30 seconds
Performance
- Failover time: <5 seconds detected, <30 seconds fully switched
- Load balancing: Combined throughput of both connections
- Reliability: 99.9%+ uptime (outages on one ISP masked by other)
Cost
- Router (3 NICs): $450
- Primary ISP: Monthly fee (existing)
- Backup ISP: $50-80/month
- Total Hardware: ~$450 + ongoing ISP costs
Lessons Learned
Gateway Monitoring Pitfalls: Initially monitored ISP gateway IPs. When ISP had routing issues (not gateway failure), failover didn’t trigger. Now monitor external IPs (Google, Cloudflare) to detect actual internet unreachability.
DNS During Failover: First failover test failed because DNS queries still tried to use primary WAN DNS servers. Configured router to use different DNS per WAN interface, automatically switching with failover.
Sticky Connections Sometimes Problematic: Video calls sometimes failed during failover despite sticky connections. Now use session helpers and shorter timeouts for UDP traffic (VoIP/RTC).
Who This Suits
Home offices requiring uptime, businesses, remote workers with critical connectivity needs, areas with unreliable single ISP, anyone wanting maximum reliability.
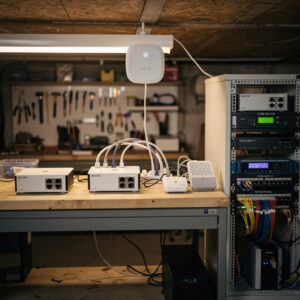
Build 5: Full Homelab Stack
Overview
The full homelab stack — serious capabilities for serious enthusiasts, sized for a house rather than a datacenter. Includes core routing, advanced security, network services, monitoring, and automation. This build demonstrates what’s possible when networking becomes a hobby and serious infrastructure investment.
Hardware
- Router: High-performance mini PC or 1U server ($500-800)
- Processor: Intel i5/i7 or AMD Ryzen (surplus enterprise thin client)
- RAM: 16 GB
- Storage: 256 GB NVMe SSD
- NICs: Quad Intel i350 (four ports) or dual 10 GbE
- Core Switch: 24-port managed Gigabit with PoE+ ($300-500)
- Access Points: 3× WiFi 6 enterprise APs ($400-600)
- Server/VM Host: Used enterprise server or high-end mini PC ($500-1000)
- NAS: Synology/QNAP or TrueNAS build ($500-1500)
- Rack and Power: 12U wall-mount rack, UPS ($400-600)
- Total Investment: $3000-5000
Network Architecture
Multi-Tier Design:
- Core Layer: Router with quad NIC, 10 Gbps links to switch and server
- Distribution: 24-port managed switch with VLANs, PoE, LAG
- Access Layer: Multiple APs, wall ports throughout home
VLAN Segmentation (8 VLANs):
- VLAN 10: Trusted (computers, phones)
- VLAN 20: IoT (smart home, limited)
- VLAN 30: Guest (isolated)
- VLAN 40: Servers (NAS, services)
- VLAN 50: Management (admin)
- VLAN 60: Cameras (surveillance)
- VLAN 70: Lab (experimental, isolated)
- VLAN 80: WAN2 (dedicated for multi-WAN)
Router Services
Core Routing:
- OPNsense or pfSense
- Multi-WAN with load balancing
- BGP/OSPF (learning protocols for lab)
Security Stack:
- Suricata IDS/IPS (active mode)
- pfBlockerNG (GeoIP, DNS filtering)
- HAProxy with SSL inspection
- Certificate management (ACME/Let’s Encrypt)
VPN Services:
- WireGuard for mobile clients (site-to-site and road warrior)
- OpenVPN for legacy compatibility
- IPsec for site-to-site to other locations
- ZeroTier for mesh networking
DNS Infrastructure:
- Unbound recursive resolver
- DNS-over-TLS to root servers
- Internal zones for local services
- Conditional forwarding for Active Directory/lab domains
Server Infrastructure
Virtualization Host:
- Proxmox VE or VMware ESXi
- 8-12 VMs running various services
- Separate VLANs for management and VM traffic
Key VMs/Services:
- Pi-hole/AdGuard Home (dedicated DNS filtering VM)
- Home Assistant (home automation controller)
- Nextcloud (self-hosted file sync)
- Plex/Jellyfin (media server)
- Git server (Gitea/GitLab)
- Monitoring (Prometheus/Grafana)
- Reverse proxy (NGINX Proxy Manager)
- Certificate authority (Step CA or Smallstep)
Network Services
Monitoring and Logging:
- Prometheus metrics collection
- Grafana dashboards (network, server, application metrics)
- Graylog or ELK for centralized logging
- SNMP monitoring of all network equipment
- Uptime Kuma for service monitoring
Automation:
- Ansible for configuration management
- GitLab CI/CD for automated deployments
- Network backups automated (OPNsense config, switch configs)
- Dynamic DNS with Cloudflare API integration
Documentation:
- NetBox or similar for IPAM (IP Address Management)
- Wiki for runbooks and procedures
- Network diagrams maintained in draw.io or Visio
Physical Infrastructure
Rack Layout:
- UPS at bottom (weight)
- Patch panel (top for easy access)
- Router (1U or shelf)
- Switch (1U)
- Server/VM host (2-4U)
- NAS (2U or shelf)
Cabling Standards:
- CAT6 throughout (future-proof to 10 Gbps)
- Color-coded patch cables (blue=LAN, red=WAN, green=mgmt, yellow=voice)
- Keystone jacks in every room
- Documentation of every cable run
Power and Protection:
- 1500VA+ UPS with network management card
- Surge protection on all lines
- Separate circuits if possible
- Power monitoring (PDU with metering)
Performance
- Routing: 10 Gbps capable (limited by ISP)
- Inter-VLAN: 10 Gbps between VMs and servers
- VPN: 500+ Mbps encrypted throughput
- Monitoring: Real-time visibility into every metric
- Reliability: Redundant paths, UPS, automated failover
Lessons Learned
Complexity vs. Utility: Initially built every possible service. Maintained 20% of them actively. Now focus on services providing real value. Complexity must justify itself.
Documentation Saves Hours: Spent days tracing cables because “I would remember.” Now document everything in NetBox. Changes take longer to document than implement, but troubleshooting takes minutes instead of hours.
Automation Is Essential: Manual configuration of 8 VLANs across 3 switches and a router is error-prone. Ansible playbooks apply configurations consistently. Version control tracks all changes.
Power and Cooling Matter: First rack overheated in closet. Added ventilation, then relocated to basement. Calculate power draw and heat generation before placing equipment.
Lab Networks Isolate Experiments: Testing new firewall rules on production caused outages. Now dedicated VLAN 70 isolates experiments. Break lab repeatedly without affecting family.
Who This Suits
Network engineers, serious homelab enthusiasts, those running home businesses requiring enterprise features, learners preparing for professional certifications, anyone wanting to explore networking without constraints.
Choosing Your Build Path
Progressive Approach
Most builders progress through stages:
- Start with Build 1: Basic DIY router to learn fundamentals
- Add VLANs (Build 2): When you have IoT devices or want segmentation
- Expand WiFi (Build 3): When coverage needs grow or performance matters
- Add Redundancy (Build 4): When uptime becomes critical
- Go Full Stack (Build 5): When networking becomes serious hobby or profession
Each build’s lessons inform the next. Skills compound. By Build 5, you have enterprise-level competence.
Budget Planning
Allocate budget across priorities:
- Router: Most important component, spend here first
- Switch: Core infrastructure, buy quality managed switch
- APs: Add gradually, one at a time if needed
- Server/Storage: Can start with existing hardware, upgrade later — when you are ready to add a dedicated NAS, the home NAS guide walks through choosing hardware and software for your first build; if you are deciding between TrueNAS, Unraid, and a Synology appliance, the TrueNAS vs Unraid vs Synology comparison covers each platform’s real trade-offs
- Cabling: Often overlooked; budget for quality cable and connectors
Buy quality over quantity. One excellent router beats three mediocre ones.
Skills Development
Each build teaches new skills:
- Build 1: Basic routing, OS installation, interface configuration
- Build 2: VLANs, trunking, inter-VLAN routing, firewall rules
- Build 3: Wireless planning, roaming, PoE, coverage optimization
- Build 4: WAN failover, gateway monitoring, load balancing
- Build 5: Enterprise architecture, monitoring, automation, documentation
Troubleshooting skills develop through each build’s challenges. Maintenance routines ensure reliability as complexity grows.
Conclusion
These five builds demonstrate the progression from simple replacement router to sophisticated network infrastructure. Each serves different needs, budgets, and skill levels. The common thread is taking control of your network through open-source software and thoughtful hardware selection.
Your network can be as simple or complex as your needs require. Start with Build 1, master the fundamentals, then expand capabilities incrementally. The investment in learning pays dividends through better performance, enhanced security, and the satisfaction of infrastructure you truly understand and control.
Whether you stop at Build 2 with basic VLANs or progress to Build 5’s full enterprise stack, you have built something better than any consumer product could provide. Your network serves your needs precisely because you designed it specifically for them.
Choose your starting point, begin building, and join the community of homelab enthusiasts who refuse to accept mediocre networking. The only limit is your curiosity and ambition.