
OPNsense WireGuard setup takes 30 minutes from blank firewall to working VPN with mobile clients connecting via QR code. This is the VPN I run on my own OPNsense box, and this tutorial walks through the complete server setup, client configuration, and firewall rule integration. WireGuard is the right VPN for OPNsense in 2026 — native, in-core support since the 24.1 release, high-hundreds-of-Mbps to near-gigabit throughput on modern mini-PC hardware, and dramatically simpler than OpenVPN.
WireGuard’s simplicity is the differentiator. The protocol uses modern cryptography (Curve25519, ChaCha20, Poly1305) with no algorithm choices to misconfigure, fewer moving parts than OpenVPN, and 4× faster connection establishment. For remote work, lab access, and mobile VPN, WireGuard is the modern answer.
Prerequisites
Before starting WireGuard setup, you need: working OPNsense installation (version 24.1 or newer for built-in, in-core WireGuard — earlier versions need the os-wireguard plugin), public IP or DDNS hostname (WireGuard server needs to be reachable from internet), port forwarding capability on your ISP gateway if behind double-NAT (or direct WAN access), and admin access to OPNsense web GUI.
For dynamic public IPs, configure DDNS first via Services → Dynamic DNS — providers like DuckDNS (free), No-IP, or Cloudflare DNS work. The DDNS hostname is what mobile clients use to find your WireGuard server. See our OPNsense setup guide for the broader OPNsense foundation.
Server Setup
Step 1: Navigate to VPN → WireGuard → Settings, enable WireGuard service. Step 2: Click “Local” tab → “+” to create a server peer. Configure: Name (home-vpn), Listen Port (51820 default), Tunnel Address (10.10.10.1/24 — pick a subnet not used by your LAN), MTU (1420 default works for most networks), and click Save. OPNsense auto-generates the public/private key pair.
Step 3: Note the public key (you’ll need this for client configuration). Step 4: Apply changes. Total time: 5 minutes for server peer creation.
Client Peer Configuration
For each device that will connect (laptop, phone, tablet), create a client peer entry. Step 1: Click “Endpoints” tab → “+” to add new client. Configure: Name (e.g., “phone”), Public Key (generate via WireGuard mobile app first, copy the public key), Allowed IPs (10.10.10.2/32 for this client’s tunnel address — increment for each client), and click Save.
Step 2: Generate client config QR code via VPN → WireGuard → Endpoints → click on client → “Show Config” or QR code icon. Step 3: Scan QR with WireGuard mobile app — connection establishes in 30 seconds.
For desktop clients (laptops), download the WireGuard app, paste the config text manually, and connect. The config includes server endpoint (your DDNS hostname:51820), allowed IPs (what the tunnel routes), and pre-shared keys.
Port Forward / NAT
WireGuard server listens on UDP 51820 (default) on the OPNsense WAN interface. For ISP-provided routers in front of OPNsense (double-NAT scenarios), forward UDP 51820 from the ISP router to the OPNsense WAN IP. For direct WAN connections (OPNsense as edge device), no port forwarding needed — OPNsense receives the traffic directly.
To verify port forwarding works: from outside your network, run `nc -u -v -z <ddns-hostname> 51820`. If the connection succeeds, the port is reachable. If it times out, port forward is misconfigured or ISP blocks UDP 51820. Switch to a different port (51821, 51822) if needed — many home ISPs filter common VPN ports.
Firewall Rules for WireGuard
Create two firewall rules: WAN inbound rule (allow UDP traffic on port 51820 to firewall — required for server to receive client connections), and Wireguard interface rule (allow tunnel traffic to LAN, internet, or whatever you want clients to access).
Recommended WG interface rules: Allow Wireguard → LAN (full access for remote work scenarios), Allow Wireguard → WAN (clients use home connection as VPN exit), Block Wireguard → IoT/Guest VLANs (segmentation). For more on rule patterns, see our OPNsense firewall rules tutorial.
Performance and Tuning
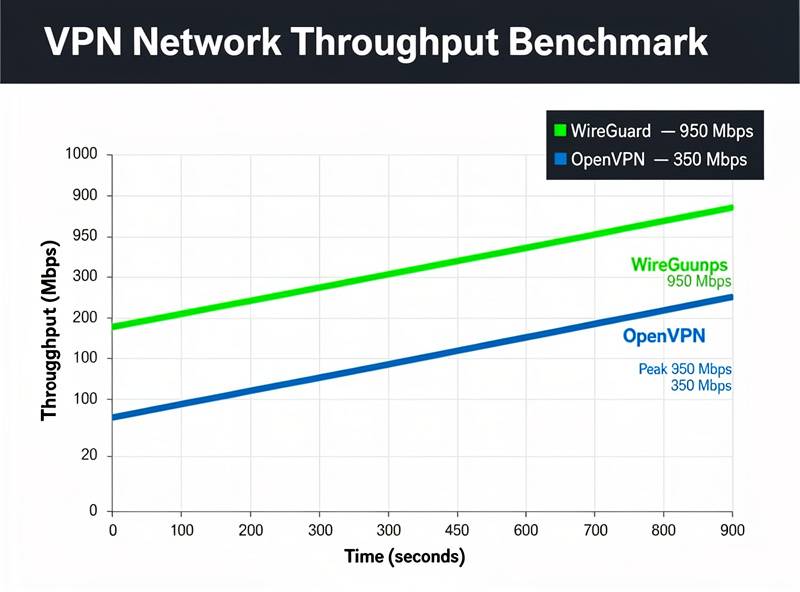
WireGuard performance on N100-class mini-PC hardware routinely reaches the high hundreds of Mbps to near-gigabit single-tunnel, with multi-tunnel throughput dropping somewhat per-tunnel under heavy concurrent load (CPU-bound). Compare to OpenVPN on identical hardware, which typically runs several times slower thanks to its userspace implementation — see Netgate’s own kernel-vs-userspace WireGuard benchmark for a documented example of the gap.
For maximum performance, ensure CPU has AES-NI (most modern Intel/AMD have it), use UDP not TCP (WireGuard is UDP-only), keep MTU at 1420 (works behind most NAT devices), and avoid running multiple compute-heavy services on the firewall. With Crowdsec, Suricata IDS, and Zenarmor all active, WireGuard throughput drops to 600-700 Mbps — still adequate for gigabit WAN.
Mobile Client Setup
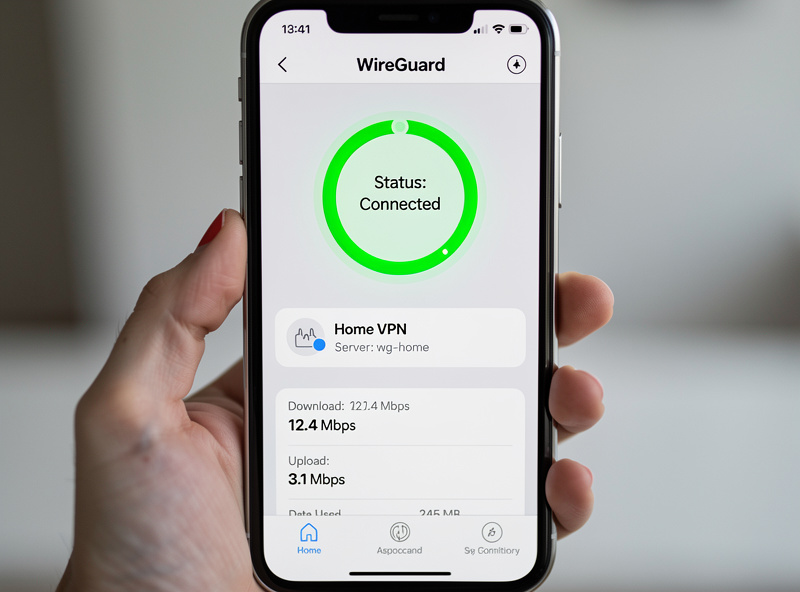
WireGuard mobile apps (iOS, Android) make setup trivial: install app, scan QR code from OPNsense GUI, connect. Total time: 60 seconds per device. Mobile clients can have always-on VPN profiles, on-demand activation, or per-app VPN routing.
Recommended mobile config: enable “On-Demand” mode that activates VPN automatically when away from home WiFi, set DNS to your OPNsense LAN IP for ad blocking (via Unbound + blocklists), and configure split-tunnel rules to keep streaming services off the VPN if needed (some platforms block VPN traffic).
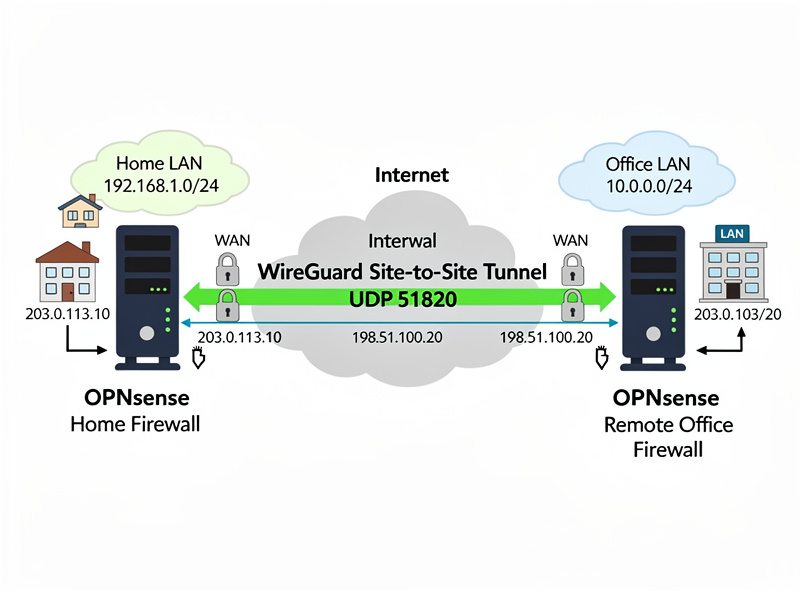
Multi-Site / Site-to-Site
For connecting two OPNsense firewalls across the internet (site-to-site VPN between home and remote office), create matching server peer entries on both firewalls, exchange public keys, configure tunnel addresses on the same subnet (e.g., 10.10.10.1 and 10.10.10.2), and add static routes for each site’s LAN subnet through the WireGuard interface.
Site-to-site WireGuard takes 1-2 hours to configure compared to 4-8 hours for IPSec or OpenVPN site-to-site. The simplicity is genuinely better. For makers running home + small office, site-to-site WireGuard provides seamless network integration.
Troubleshooting Common Issues
Connection times out: check port forwarding (nc -u test from outside), verify firewall WAN rule (allow UDP 51820 inbound), confirm DDNS hostname resolves correctly. Connects but no traffic flows: check Wireguard interface firewall rules (need allow rule from wg0 to LAN), verify allowed IPs on client config matches tunnel address subnet. Slow speeds: check CPU usage during transfer (should be 30-60% on N100), try increasing MTU to 1500 if not behind double-NAT, verify AES-NI active (`dmesg | grep AES`).
OPNsense provides detailed WireGuard status via VPN → WireGuard → Status. Look for handshake timestamps (recent = healthy), bytes transferred (zero = no traffic), and last endpoint (matches expected client IP). For deeper debugging, watch live logs via System → Log Files → Live View filtered for “wireguard.”
Decision Framework
For home users wanting remote access to LAN: WireGuard via OPNsense in 30 minutes. The right tool.
For traveling users wanting privacy on public WiFi: WireGuard with split-tunnel (only sensitive traffic via VPN). 45 minutes setup including app configs.
For multi-site small business: site-to-site WireGuard between two OPNsense firewalls. 1-2 hours setup including testing.
For commercial VPN service: WireGuard is overkill — use a paid VPN service (Mullvad, ProtonVPN). Self-hosted only makes sense if you need access to your home/office resources.
For broader OPNsense context see OPNsense setup guide. For comparison with pfSense WireGuard, see OPNsense vs pfSense 2026.
Frequently Asked Questions
How fast is WireGuard on OPNsense?
On N100-class mini-PC hardware, single-tunnel throughput routinely reaches the high hundreds of Mbps to near-gigabit. Adding Crowdsec, Suricata, and Zenarmor together noticeably cuts into that headroom. WireGuard is several times faster than OpenVPN on identical hardware thanks to its kernel-mode implementation.
Is WireGuard or OpenVPN better for OPNsense?
WireGuard, decisively. Faster connection establishment (4x faster), higher throughput (3-4x), simpler configuration (no algorithm choices), better mobile app support, and lower CPU usage. OpenVPN is mature but legacy. Use OpenVPN only if you need TCP transport (rare) or compatibility with old clients.
How do I configure WireGuard on iPhone?
Install WireGuard from the App Store. In OPNsense, navigate to VPN → WireGuard → Endpoints → your client peer → Show QR Code. Open WireGuard app on iPhone, tap Add Tunnel → Create from QR Code, point camera at the QR code. Tunnel created in 30 seconds. Toggle to connect.
What ports does WireGuard need?
UDP 51820 by default (configurable). For double-NAT setups, port forward UDP 51820 from ISP router to OPNsense WAN IP. For direct WAN, no port forwarding needed. Some ISPs filter common VPN ports — switch to non-standard ports (51821, 51822) if 51820 is blocked.
Can WireGuard work behind CGNAT?
No, not directly. Carrier-grade NAT means you don’t have a unique public IP — multiple customers share IPs. WireGuard server requires a publicly reachable address. Solutions: contact ISP for static IP (often $5-15/month), use a relay service (Tailscale, Headscale), or use a cloud VPS as relay ($5/month).
Is WireGuard secure?
Yes, very. WireGuard uses modern cryptography: Curve25519 (key exchange), ChaCha20 (encryption), Poly1305 (authentication), BLAKE2s (hashing). No algorithm negotiation means no downgrade attacks. The codebase is small (~4,000 lines vs OpenVPN’s 100,000+) making security audits feasible. Audited and used by major organizations.
How many WireGuard clients can OPNsense handle?
Hundreds, easily. Each client peer adds minimal overhead (small memory footprint, negligible CPU). N100-class hardware handles dozens of simultaneous active connections without meaningful degradation. Server limits are typically network bandwidth, not WireGuard itself.
Related Articles
- OPNsense Setup Guide
- OPNsense Firewall Rules Tutorial
- OPNsense vs pfSense 2026
- OPNsense Essential Plugins
- pfSense WireGuard Setup