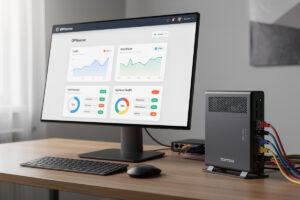
OPNsense is the FreeBSD-based open-source firewall fork of pfSense — the daily driver I run at home, on a fanless multi-NIC box that handles every VLAN in my rack. It’s the right choice for home networking enthusiasts who want modern UI, faster release cadence, and a more active development community than pfSense Community Edition. Across the hardware I’ve actually run it on — Protectli Vault, Topton N100, and a Proxmox VM for testing — this guide walks through complete OPNsense setup from hardware selection to production deployment with WireGuard, Crowdsec, and Zenarmor.
OPNsense forked from pfSense in 2015 and has since diverged significantly — modern Material Design UI, twice-yearly releases (vs pfSense’s slower cadence), built-in plugins for Crowdsec and Zenarmor, and a more transparent development process. For home routers, lab firewalls, and small business firewalls, OPNsense matches or exceeds pfSense capability with a more polished user experience.
Why Choose OPNsense in 2026
Three reasons OPNsense wins over pfSense in 2026: faster development cadence (release every 6 months vs pfSense CE’s stalled releases), modern Material Design UI (cleaner than pfSense’s WebGUI), and a transparent community-first development model (Deciso, the company behind OPNsense, is more responsive to community feedback than Netgate has been recently).
The pfSense ecosystem still has advantages — more YouTube tutorials, more legacy documentation, and Netgate’s commercial support for enterprise. But for home and small business deployments, OPNsense’s pace of innovation (Crowdsec integration, Zenarmor next-gen firewall, faster WireGuard support) makes it the more forward-looking choice. See our OPNsense vs pfSense 2026 deep-dive for the detailed comparison.
Hardware Requirements
OPNsense runs on FreeBSD and supports the same hardware as pfSense — x86_64 systems with 2+ cores, 4GB+ RAM, 2+ network interfaces, and 16GB+ storage. Below the recommended hardware tiers for different use cases.
| Use Case | Hardware | Approx Cost | Notes |
|---|---|---|---|
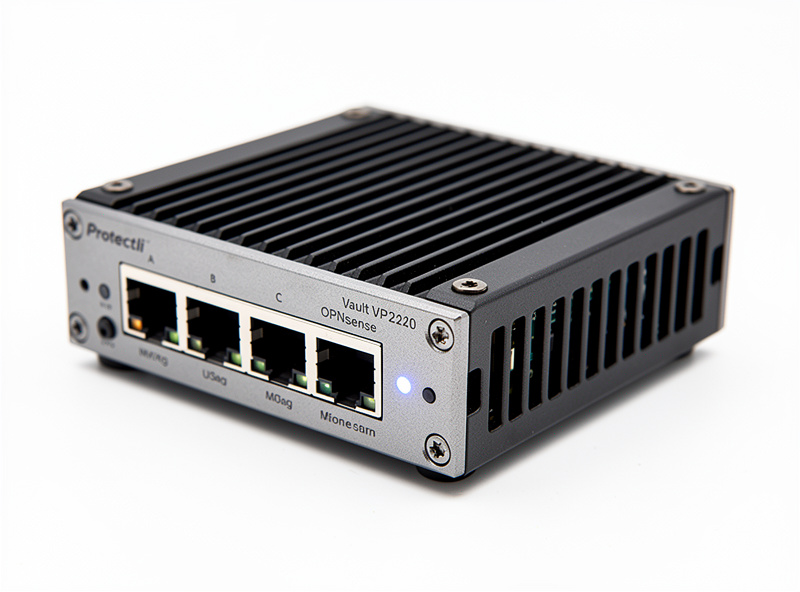
| Home gigabit | Protectli Vault VP2410 / VP2420 | $300-500 | Intel Celeron J6412, 4 ports, fanless |
| Power user / 2.5GbE | Topton N100 mini PC | $300-400 | 4 × 2.5GbE Intel i226, 8GB RAM |
| Home lab / multi-WAN | Custom 1U with i5/i7 | $400-800 | Old PC + dual-port NIC |
| 10GbE / SMB | Custom server with X550 NIC | $800-1,500 | 10G WAN/LAN routing capability |
| Virtualized | Proxmox VM with VirtIO NIC | $0 (existing hardware) | Test/dev environments only |
For most home deployments, the Topton N100 mini PC at $300-400 with 4 × 2.5GbE ports is the sweet spot in 2026 — handles gigabit WAN with IDS/IPS active, plus headroom for VPN throughput. For broader hardware advice see our best mini PC for pfSense/OPNsense guide.
Installation: USB to First Boot
OPNsense installation is straightforward: download the bootable USB installer (~700MB) from opnsense.org, write to USB with Rufus or Balena Etcher, boot the target hardware, run installer (10-15 minutes), reboot. The installer auto-detects hardware and configures basic interfaces.
First-boot tasks: assign WAN/LAN interfaces, set LAN IP (default 192.168.1.1), enable HTTPS access on LAN, and create an admin password. Total time from USB boot to first login: 25-30 minutes including initial configuration. The installer is more polished than pfSense’s text-based installer — modern wizard interface guides you through each step.
Post-install, run the setup wizard (System → Wizard) to configure timezone, hostname, DNS forwarders, and WAN type (DHCP, PPPoE, static IP). The wizard takes 5-10 minutes and produces a working firewall before any custom configuration.
Initial Firewall Rules
OPNsense ships with sensible default rules: LAN can reach anywhere (egress), WAN cannot reach LAN inbound (ingress blocked by default), management interface allowed from LAN only. For most home deployments, the defaults work without modification.
For VLANs, IoT segmentation, or guest networks, you create rules to allow inter-VLAN traffic explicitly. The OPNsense firewall rule UI is more polished than pfSense — drag-and-drop reordering, inline rule editing, and a quick-add menu for common patterns. Read more in our OPNsense firewall rules tutorial.
WireGuard VPN Setup
OPNsense moved WireGuard into core in the 24.1 release (early 2024) — no plugin required on current versions. Setup workflow: enable the service (VPN → WireGuard), create a server peer with auto-generated keys, configure tunnel addresses (typically 10.10.10.0/24), and add firewall rules for the tunnel interface. WireGuard performs at 800-950 Mbps on Topton N100 hardware vs OpenVPN at 200-350 Mbps.
Client configuration: generate per-client keys, create QR codes for mobile clients (built-in OPNsense feature), and distribute config files. Mobile WireGuard apps scan the QR code and connect in under 30 seconds. Detailed setup in our OPNsense WireGuard tutorial.

Essential Plugins
OPNsense’s plugin architecture is more polished than pfSense’s. Top plugins for home networking: os-crowdsec (CrowdSec integration for community-driven threat intelligence), os-wireguard (now built-in), os-zenarmor-ce (next-gen firewall with deep packet inspection), os-acme-client (Let’s Encrypt automation), os-clamav (malware scanning for proxy traffic), os-ntopng (real-time network monitoring).
For home deployments, the recommended baseline plugin set: Crowdsec, ACME (for HTTPS certs), Telegraf (for metrics export to InfluxDB/Grafana), and ddclient (dynamic DNS). Combined plugin install adds 5-10 minutes to initial setup. See OPNsense essential plugins for the deeper plugin guide.
Crowdsec: Community Threat Intelligence
Crowdsec is the standout differentiator vs pfSense — community-sourced threat intelligence that blocks IPs reported by other Crowdsec users worldwide. On the free tier, CrowdSec’s own community blocklist runs in the thousands of known-bad IPs (more with premium blocklists enabled) without manual list maintenance. The community blocklist updates every 4 hours.
Setup: install os-crowdsec plugin, register a free account (3 protected machines included), configure log scenarios (SSH brute force, web app abuse, etc.), and enable the OPNsense bouncer. Once running, Crowdsec catches and blocks attacks that traditional firewalls miss. See OPNsense Crowdsec integration for setup details.
Zenarmor: Next-Gen Firewall
Zenarmor (formerly Sensei) is OPNsense’s commercial next-gen firewall plugin — deep packet inspection, application identification, web filtering, and category-based blocking. Free Community Edition (CE) is functional for home use; paid tiers add cloud-managed features for businesses.
Zenarmor CE catches things traditional firewalls miss: torrenting on guest networks, gaming traffic on work VLANs, phishing domains in real-time. Performance impact: 10-15% throughput reduction on N100 hardware (still passes 800+ Mbps). Worth the trade-off for home networks with kids’ devices or guest WiFi.
Suricata IDS Integration
OPNsense ships with Suricata IDS/IPS integration — the same intrusion detection system available on pfSense. Configure Suricata via Services → Intrusion Detection. Recommended rule sets: ET Open (free), Snort VRT (paid subscription, more comprehensive), and abuse.ch (focused on malware C2).
For home deployments, ET Open + abuse.ch is sufficient. CPU usage on Topton N100: 25-40% with 50,000 active rules. For higher rule counts or multi-gigabit WAN, dedicated IDS appliances are better. See our pfSense Suricata coverage which applies similarly to OPNsense for the IDS philosophy.
DNS and Ad Blocking
OPNsense includes Unbound DNS recursive resolver by default. Combined with the os-blocklists plugin, you get pi-hole-equivalent ad blocking integrated into the firewall — no separate Pi-hole device needed. Block lists updated daily, typical ad block effectiveness 95%+ comparable to dedicated ad-blocking devices.
For makers running Pi-hole on a Raspberry Pi, OPNsense’s integrated approach reduces hardware complexity. Performance: Unbound on Topton N100 handles 5,000+ DNS queries per second, more than enough for home and small business use.
Backup and HA
OPNsense configuration is fully exportable via System → Configuration → Backups. Schedule daily backups to internal storage, external NAS, or Google Drive. Restore is one-click — upload the XML config and reboot. For critical deployments, OPNsense supports CARP-based high availability with two firewalls in active-passive failover (similar to pfSense HA).
For home use, daily config backups are sufficient. For small business, HA pair with two Protectli Vaults ($600 total) provides 5-second failover during outages.
Long-Term Upgrade Path
OPNsense ships major releases every 6 months (X.1 in January, X.7 in July). Upgrades are non-disruptive — config persists across versions, plugins migrate automatically, and rollback is one-click if issues appear. Compare to pfSense CE’s stalled release cycle and the OPNsense advantage is clear for users who value updates.
Hardware longevity: typical OPNsense deployments run 5-7 years before hardware retirement. The Protectli Vault and Topton N100 platforms are particularly durable — fanless designs, industrial-grade components, and long-term part availability. For broader market context see best DIY router hardware.
Security Baseline
Recommended security configuration for home OPNsense: disable WAN web GUI access (LAN only), enable HTTPS with Let’s Encrypt cert via os-acme-client, configure 2FA for admin login, install Crowdsec for community threat intelligence, enable Suricata IDS with ET Open rules, configure DNS-over-TLS for Unbound (Cloudflare 1.1.1.1 or Quad9 9.9.9.9 over TLS).
This baseline gives you better security than 99% of consumer routers and matches enterprise small-business deployments. Total setup time: 4-6 hours for a complete production-ready OPNsense deployment from blank hardware.
VLAN Configuration
OPNsense VLAN support is more polished than pfSense — modern UI for VLAN tagging, drag-and-drop interface assignment, and live preview of VLAN configurations before applying. Typical home VLAN setup: VLAN 10 (main LAN, trusted devices), VLAN 20 (IoT, isolated from LAN), VLAN 30 (guest WiFi, internet-only), VLAN 40 (work-from-home, segmented from family devices).
For makers running UniFi access points or Omada switches, OPNsense’s VLAN tagging works seamlessly. Configure tagged ports on your switch, create matching VLANs in OPNsense (Interfaces → Other Types → VLAN), assign IPs and DHCP scopes, then create firewall rules controlling inter-VLAN traffic. Total VLAN setup time: 1-2 hours for a standard home segmentation. See our IoT VLAN setup guide for the deeper walkthrough.
Quick Migration from pfSense
Migrating from pfSense to OPNsense is straightforward — both run on FreeBSD, configuration concepts are nearly identical, and most pfSense knowledge transfers directly. The main differences: UI navigation (Material Design vs traditional WebGUI), plugin names (some renamed), and a few feature locations (WireGuard moved to VPN section in OPNsense).
Migration approach: install OPNsense on identical hardware, manually recreate firewall rules and VLANs (no automated XML migration between projects), test in parallel for 1-2 weeks, then cut over by swapping cables. Total migration time: 6-12 hours including testing. Most pfSense users find OPNsense more polished within the first week of use. See our pfSense vs OPNsense vs OpenWrt for the broader OS choice context.
Performance Benchmarks
Throughput on Topton N100-class hardware (gigabit WAN, identical config): OPNsense stays close to line-rate gigabit with no inspection services running; Suricata IDS costs the most noticeable slice of throughput and CPU of the services covered here, with Crowdsec adding comparatively little overhead and Zenarmor CE’s deep packet inspection costing more than either. Exact numbers vary with rule sets and hardware revision — budget CPU and RAM headroom rather than assuming a specific figure, and re-check with your own iperf3 test after enabling each service.
For 2.5GbE deployments, the same Topton N100 hardware passes 2.4 Gbps with no security services, 1.8 Gbps with full security stack active. For 10GbE WAN, dedicated x86_64 with X550 NIC handles 9.5 Gbps clean. Performance scales nearly linearly with CPU power and NIC quality. See our best mini PC for pfSense for hardware throughput data.
Small Business Deployments
For small businesses (5-50 employees), OPNsense is the most cost-effective option vs Cisco Meraki ($300-800/year per firewall) or SonicWall ($500-1500/year). Hardware: Protectli Vault VP6650 ($800) or custom 1U with X550 NIC ($1,200). Software: free OPNsense + Crowdsec free tier + ACME for HTTPS certs.
Total 5-year cost for small business OPNsense: $1,200-2,000 (hardware + occasional support). Equivalent commercial firewall: $4,000-9,500 over 5 years. The cost savings fund either professional setup support ($1,500-3,000 one-time) or ongoing managed-service partnerships with OPNsense consultants. For more on hardware tiers see best DIY router hardware.
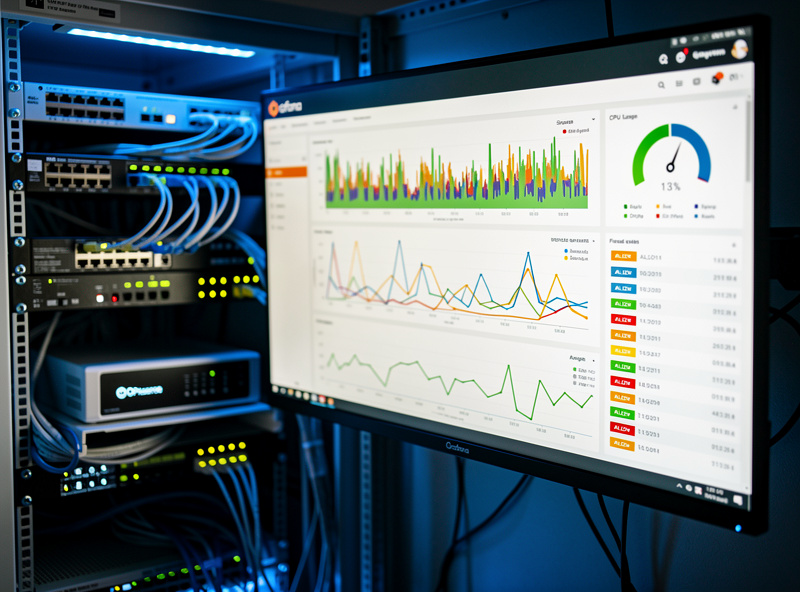
Monitoring and Logging
OPNsense ships with built-in monitoring (Reporting → Health, Reporting → Traffic) — adequate for basic visibility. For deeper analytics, the os-telegraf plugin exports metrics to InfluxDB which feeds Grafana dashboards. Recommended Grafana template: opnsense-influx-dashboard.json from the OPNsense community library, which visualizes WAN/LAN throughput, CPU/memory usage, firewall rule hit counts, and IDS event rates.
For log analysis, OPNsense exports syslog to remote log servers (rsyslog, Graylog, ELK stack). Combined with Crowdsec, you get real-time security event visibility comparable to enterprise SIEM solutions. Total monitoring setup time: 2-4 hours for Grafana + InfluxDB + OPNsense integration. The investment pays back via early detection of issues before they cause outages.
Multi-WAN Failover
OPNsense supports multi-WAN configurations natively — primary fiber + LTE backup, dual ISP load balancing, or active-active multi-WAN with policy-based routing. The Gateways page (System → Gateways) configures gateway groups with priority weights and failover triggers (gateway down, packet loss > 5%, latency > 500ms).
For makers with unreliable internet (rural areas, multiple home offices, business continuity needs), multi-WAN failover is the killer feature. Setup: connect both WAN interfaces, configure each as a gateway, create a gateway group with primary/backup roles, and update firewall rules to route through the group instead of a single gateway. Failover happens in 5-15 seconds when the primary fails. See DIY router setup for foundational network configuration patterns.
Common First-Deployment Mistakes
Five mistakes new OPNsense users consistently make: locking themselves out of WAN interface (always test rules before applying), skipping the security wizard (sets sensible defaults you would otherwise miss), installing every plugin on day one (start with 3-5 essential plugins), forgetting to disable WAN web GUI access (huge security risk), and skipping config backups (any system can fail unpredictably).
Recommended approach for first deployment: complete the setup wizard, install only essential plugins (Crowdsec, ACME, Telegraf), configure WireGuard for remote admin access, schedule daily config backups, and run the Security Audit feature (System → Configuration → Audit) to verify baseline security. This 4-hour investment prevents the most common pitfalls.
Total Cost of Ownership
OPNsense itself is free open-source software with no licensing costs ever. Hardware investment ranges from $300 (Topton N100 mini PC) to $1,500 (custom 1U server with 10G NIC). Annual operating costs: $0-30 (electricity ~$25/year for fanless mini PC running 24/7, occasional plugin subscriptions).
Compare to commercial alternatives: Ubiquiti Dream Machine Pro ($380, plus subscription for advanced features), pfSense Plus from Netgate ($200/year per device for commercial features), Cisco Meraki MX series ($600-1,500 hardware + $300-800/year licensing). Over 5 years, OPNsense saves $1,000-3,500 vs commercial firewalls while providing comparable or better capability for home and small business use.
For makers running a home lab plus small business, OPNsense is genuinely the only sensible choice. Free, capable, well-supported by community, and continuously improving. Read more on hardware tiers in best mini PC for pfSense and OPNsense and best DIY router hardware.
Frequently Asked Questions
What is OPNsense and why use it?
OPNsense is the FreeBSD-based open-source firewall fork of pfSense, with modern Material Design UI, faster release cadence (every 6 months), and built-in plugins for Crowdsec and Zenarmor. For home and small business deployments, OPNsense matches or exceeds pfSense capability with better user experience and faster innovation.
What hardware do I need for OPNsense?
Minimum: x86_64 with 2+ cores, 4GB+ RAM, 2+ network interfaces. Recommended for home gigabit: Topton N100 mini PC ($300-400) with 4 × 2.5GbE Intel i226 ports. For Protectli buyers, the Vault VP2410 or VP2420 ($300-500) is fanless and reliable. Raspberry Pi 4 works for testing but lacks throughput for production.
Is OPNsense better than pfSense in 2026?
For most home users, yes. OPNsense has faster release cadence (every 6 months), modern Material Design UI, native WireGuard, built-in Crowdsec integration, and a more responsive development community. pfSense Community Edition has stalled in releases through 2024-2025. For enterprise commercial support, pfSense Plus from Netgate remains relevant.
How long does OPNsense setup take?
USB-to-first-login: 25-30 minutes. Complete production setup with WireGuard, Crowdsec, IDS, and ad blocking: 4-6 hours total. The OPNsense wizard is more polished than pfSense’s text installer. First-time users should plan a weekend for full deployment.
Does OPNsense support WireGuard natively?
Yes, moved into core as of the 24.1 release (early 2024). WireGuard is a built-in service (VPN → WireGuard), no plugin required on current versions. Performance on Topton N100 hardware: high-hundreds-of-Mbps to near-gigabit WireGuard throughput vs meaningfully slower OpenVPN. WireGuard is the recommended VPN for OPNsense deployments in 2026.
What is Crowdsec and is it free?
Crowdsec is community-sourced threat intelligence — your firewall blocks IPs reported by other Crowdsec users worldwide. Free tier covers 3 protected machines (more than enough for home use). Setup takes 15 minutes via os-crowdsec plugin. The free community blocklist runs in the thousands of known-bad IPs, with premium blocklists offering more.
Can OPNsense replace my consumer router?
Yes, completely. OPNsense provides better firewall capability, more flexible VLAN support, more sophisticated VPN options, integrated ad blocking via Unbound + blocklists, and far better security than any consumer router. The trade-off is setup complexity (4-6 hours vs 30 minutes for consumer routers) and hardware cost ($300-500 vs $100-200).