pfSense is the dominant open-source firewall and router platform for serious home lab and small business networks. The platform handles everything from basic NAT routing to enterprise-grade firewalls, VPN servers, intrusion detection, and traffic shaping. This guide walks through pfSense configuration from initial install through production-ready setup, covering the features that turn a basic router into a comprehensive network security platform.
Most beginners install pfSense, run through the initial wizard, and stop there. That works for the first month. By the time you start hosting services, working from home, or adding IoT devices, pfSense’s deeper features become the difference between a basic NAT box and a network that actively protects you. The configuration steps below come from real production deployments — they’re what works, not what’s theoretically optimal.
What pfSense Actually Does
pfSense is FreeBSD-based router/firewall software that runs on x86 hardware. In ~40 words: it replaces consumer routers with enterprise-grade routing, NAT, firewalling, VPN, IDS/IPS, content filtering, traffic shaping, and bandwidth monitoring. Every feature works without subscriptions or “premium” tiers — the entire platform is free and open-source.
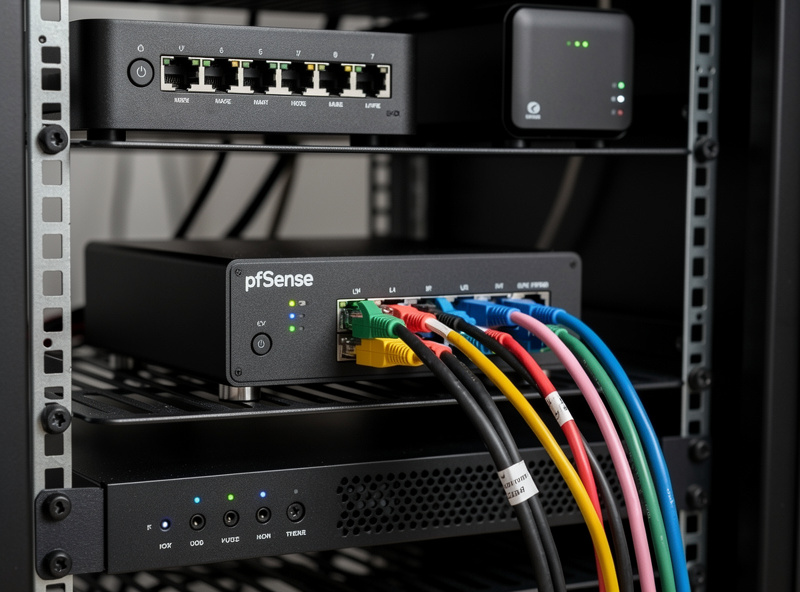
The hardware requirement is modest. Any x86 mini PC with 2+ network ports and 4GB+ RAM runs pfSense well. Common choices: Protectli Vault (purpose-built), Topton N100 mini PCs, repurposed thin clients, or virtual machines on existing servers. Our DIY router hardware guide covers hardware selection in depth.
The complexity is real but linear. Each feature adds complexity, but each works independently. You can run pfSense as a basic router for years before needing to learn IDS, VPN, or traffic shaping. The depth is there when you need it.
Initial Install and Setup Wizard
Download the pfSense installer from netgate.com (Netgate sponsors and develops pfSense). The current stable as of 2026 is pfSense CE 2.7.x. Burn to USB with Rufus or BalenaEtcher. Boot from USB on your target hardware.
The installer takes 10-15 minutes. Default options work for most setups: ZFS filesystem (better than UFS for snapshots and reliability), full installation (not embedded), and accept the default partitioning. After installation, remove the USB and reboot.
First boot launches the console-based setup wizard. Configure WAN interface (typically the first network port, connected to your modem), LAN interface (second port, connected to your switch), and assign a LAN IP (192.168.1.1 is the default). Save and apply.
Connect a laptop to the LAN port. Browse to the LAN IP. The web interface launches a setup wizard for hostname, time zone, DNS servers, and admin password. Complete the wizard. pfSense is now functional as a basic router.
Firewall Rules: The Core of pfSense
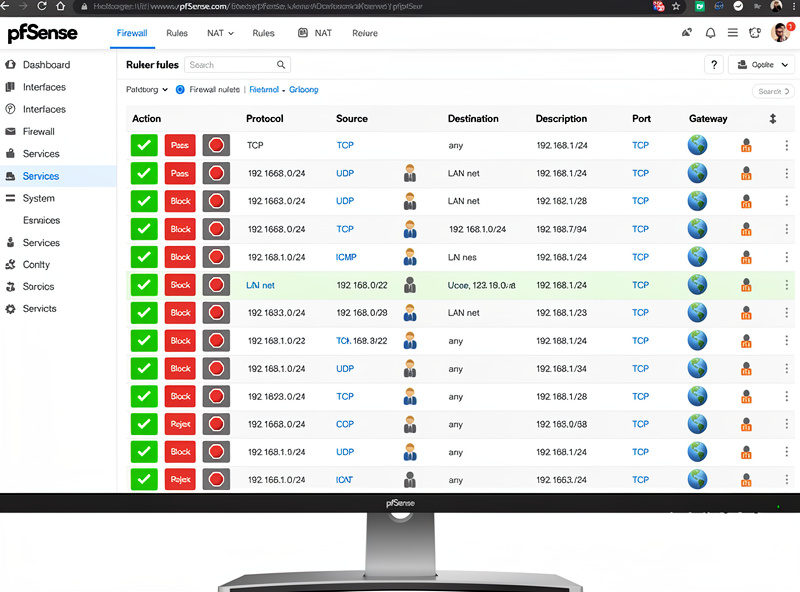
pfSense’s firewall rules system is the platform’s most powerful feature and the steepest learning curve. The default LAN rule is “allow all from LAN to anywhere” — a permissive default that lets everything out. Tighten this for production use.
The basic firewall philosophy: deny by default, allow what’s needed explicitly. This is the opposite of consumer routers, which allow everything by default. The shift produces dramatically tighter security at the cost of having to think about what your network actually needs.
Configure rules: Firewall → Rules → LAN tab. The default “Allow LAN to any” rule is fine for getting started. Add specific deny rules above it as you tighten down. Common production rules: deny LAN access to specific IoT VLANs, allow only specific ports outbound for internal services, deny private-IP addresses spoofed as source addresses.
For a deeper firewall rules walkthrough, see our pfSense firewall rules tutorial. The home network security guide covers the broader hardening approach: home network security hardening.
VLAN Setup for Network Segmentation
VLANs separate your network into isolated zones. The standard home setup: main LAN (trusted devices), IoT VLAN (smart home devices), guest VLAN (visitors), and DMZ (public-facing services).
VLAN setup requires a managed switch (TP-Link Omada, UniFi, or similar). pfSense creates VLAN interfaces on a single physical port; the managed switch tags traffic per port to the correct VLAN.
Configure in pfSense: Interfaces → Assignments → VLANs tab → Add. Specify parent interface (the physical port), VLAN tag (101, 102, etc.), and description. Save. Then assign each VLAN to an interface and configure DHCP separately per VLAN.
The result: devices on the IoT VLAN can’t see devices on the main LAN, even though they’re on the same physical switch. Smart home devices remain isolated from work computers; guest devices can access the internet but not your file shares.
DHCP and DNS Configuration
pfSense’s DHCP server replaces your consumer router’s DHCP. Configure per-VLAN: Services → DHCP Server → select interface → enable. Set IP range (e.g., 192.168.1.100-192.168.1.200), gateway (the LAN interface IP), and DNS servers.
For DNS, pfSense’s built-in resolver (Unbound) is excellent. Enable DNS resolver: Services → DNS Resolver → enable. The resolver handles DNS queries directly without forwarding to ISP DNS — improving privacy and speed. Combined with DNS-over-TLS, your DNS queries become encrypted to public DNS servers.
For ad blocking, install pfBlockerNG — see our pfBlockerNG tutorial for full setup. Configure DNSBL feeds (Abuse.ch, Easylist, etc.) to block ads and trackers at the DNS level. The result is network-wide ad blocking that works across all devices without browser-specific extensions.
VPN Server: WireGuard and OpenVPN
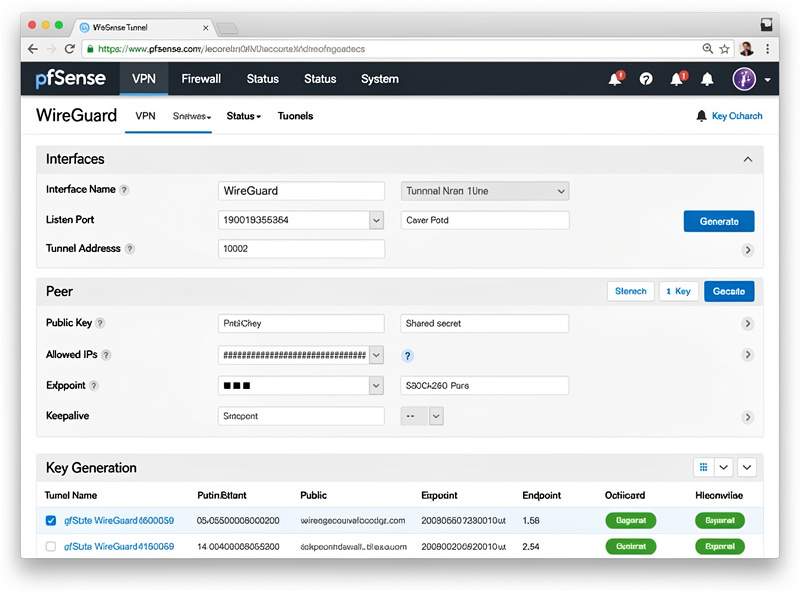
pfSense supports both WireGuard and OpenVPN as VPN server platforms. WireGuard is faster and simpler; OpenVPN has broader client compatibility. For new deployments in 2026, WireGuard is the right default.
For complete WireGuard setup details, see our pfSense WireGuard setup guide. WireGuard setup: install the WireGuard package via Package Manager, then VPN → WireGuard. Create a new tunnel with a unique listening port (e.g., 51820). Generate server keys. Add peers (your phones, laptops, remote devices) with their own keypairs. Save and apply.
Configure firewall rules for VPN traffic: Firewall → Rules → WireGuard tab → allow VPN traffic to LAN. Without this rule, connected VPN clients can connect to pfSense but can’t access your LAN resources.
Test from a remote network. Install the WireGuard client on your phone, scan the QR code from pfSense’s peer config, connect. Your phone now has access to your home network as if physically connected. Useful for remote access to home services without exposing them publicly. Our VPN, DNS, and privacy guide covers self-hosted VPN options in depth.
Intrusion Detection: Suricata IDS
Suricata is an open-source IDS/IPS that monitors network traffic for malicious patterns. pfSense bundles Suricata as a Package Manager addition. Once installed and configured, Suricata watches every packet flowing through pfSense and alerts on (or blocks) suspicious activity.
Install Suricata: System → Package Manager → Available → search “suricata” → install. Configure interfaces to monitor (typically WAN), enable rule sources (Emerging Threats Open is free; Snort VRT requires a free registration for the community feed), and start the service.
For Suricata setup details, see our pfSense Suricata tutorial. Suricata generates significant CPU load — a Protectli Vault FW2B (Celeron J3160) can become CPU-bound running Suricata on gigabit WAN. For high-bandwidth connections (1Gbps+), use more capable hardware (Topton N100 mini PCs handle Suricata at gigabit speeds without issue).
The output is a log of detected threats and (optionally) blocked attacks. Reviewing the alert log periodically catches actual intrusion attempts and tunes the detection rules to reduce false positives. For most home networks, the alerts are interesting more than actionable — but the deterrent effect is real.
Traffic Shaping and QoS
Traffic shaping prioritizes certain types of traffic over others. The classic use case: ensuring video calls stay smooth even when someone else is downloading a large file.
Configure via Firewall → Traffic Shaper → Wizard. The wizard walks through common scenarios — VoIP priority, gaming priority, BitTorrent throttling. For typical home networks, the “single LAN” wizard with VoIP priority covers the common case.
The fundamental limit: traffic shaping only helps when bandwidth is constrained. On gigabit fiber with rarely-saturated upstream, shaping makes no measurable difference. On slower connections (DSL, fixed wireless, sometimes cable), shaping noticeably improves user experience under load.
For families on slower internet, traffic shaping is one of the highest-ROI pfSense features. See our pfSense traffic shaping guide for the complete Wizard walk-through. It prevents the “kid is gaming and breaks Mom’s video call” scenarios that plague unmanaged home networks.
Backup and High Availability
pfSense backups are essential. Configure automated backups: Diagnostics → Backup & Restore → ACB (auto-config backup) → enable. Backups store configuration changes automatically; you can restore to any previous state.
For high availability, pfSense supports CARP (Common Address Redundancy Protocol) — see our pfSense HA setup guide for full deployment details. Two pfSense boxes share a virtual IP; if the primary fails, the secondary takes over automatically. The setup is complex but produces near-zero-downtime networking.
For most home networks, HA is overkill. Single-box pfSense with regular config backups is sufficient — recovery from a failure means restoring the backup on a replacement box (15-30 minutes total). For small businesses or home networks running critical services, CARP HA pays back the complexity.
Our network troubleshooting guide covers common pfSense issues and their fixes.
IPv6 Configuration
pfSense supports IPv6 across all features. ISPs increasingly deploy IPv6 alongside IPv4 (dual-stack), and pfSense handles both transparently. Configure WAN IPv6 type based on your ISP — DHCPv6 for most cable/fiber, PPPoE with IPv6 for some DSL providers.
For LAN: Track Interface (configures LAN to use the IPv6 prefix delegated by the ISP) is the right setting for typical home networks. pfSense distributes IPv6 addresses to LAN devices via SLAAC or DHCPv6. Most modern devices auto-configure.
Firewall rules for IPv6 mirror IPv4 — same default-allow-LAN-out rule, same VLAN isolation, same port-forwarding workflow. The main practical difference is verifying IPv6 connectivity at startup; ipv6-test.com confirms outbound connectivity is working.
Dynamic DNS for Home Connections
Most home internet connections have dynamic public IPs that change periodically. Dynamic DNS (DDNS) maps a hostname to your current IP, automatically updating when the IP changes. This is essential for any service hosted at home — VPN access, hosted websites, remote desktop.
pfSense supports many DDNS providers via Services → Dynamic DNS. Common free options: DuckDNS (no signup beyond GitHub OAuth), No-IP (free with periodic re-confirmation), Cloudflare DNS (free if you own a domain). Configure once; pfSense updates the DDNS provider whenever the WAN IP changes.
For users with hostnames you control (own domain), Cloudflare DDNS is the polished choice — works with any subdomain, supports both A and AAAA records (IPv4 and IPv6), and uses standard DNS infrastructure rather than provider-specific tooling.
Package Manager and Plugin Ecosystem
pfSense’s Package Manager extends the base platform with optional features. The selection is curated for stability — only packages tested against the current pfSense version appear.
Essential packages worth knowing about: pfBlockerNG (DNS/IP filtering, covered above), Suricata (IDS, covered above), WireGuard (VPN, covered above), OpenVPN-client-export (simplifies OpenVPN client config), iperf3 (built-in network performance testing), arpwatch (alerts on MAC address changes — security feature for catching rogue devices), darkstat (lightweight network statistics).
Avoid: packages from third-party repositories (security risk), packages marked deprecated (may break on next pfSense update), and overly-aggressive monitoring packages on resource-constrained hardware (they consume CPU and RAM faster than they’re worth).
pfSense vs OPNsense vs OpenWrt (Quick Comparison)
| Feature | pfSense CE | OPNsense | OpenWrt |
|---|---|---|---|
| Best for | Mature deployments, enterprise features | Similar to pfSense, faster updates | Embedded routers, low-power hardware |
| Hardware | x86 mini PC (4GB+ RAM) | x86 mini PC (4GB+ RAM) | Embedded routers + some x86 |
| UI | Web (PHP, mature) | Web (modern, Phalcon) | Web (Lua, lightweight) |
| Plugins | Many, well-curated | Many, faster ecosystem | Most diverse, some quality variance |
| VPN | WireGuard, OpenVPN, IPsec | WireGuard, OpenVPN, IPsec | WireGuard, OpenVPN |
| IDS/IPS | Suricata, Snort | Suricata, Zenarmor | Limited (smaller hardware) |
| Update cycle | Conservative (months) | Faster (weeks) | Per-router lifecycle |
| Learning curve | Steep | Steep | Steeper for x86 use |
For most desktop CNC users in 2026, pfSense remains the right default — mature, well-documented, and broadly compatible with hardware. OPNsense is a strong alternative with faster update cycles. OpenWrt fits embedded routers and budget hardware better than full mini-PC firewall use. For deeper comparison, see our router OS comparison guide.
Multi-WAN and Failover
For users with two internet connections — cable + DSL, fiber + cellular backup, or any combination of two WAN sources — pfSense handles multi-WAN gracefully. Failover means if the primary connection dies, pfSense automatically routes through the backup. Load balancing splits traffic across both connections for higher aggregate throughput.
Setup: System → Routing → Gateways → add the second WAN gateway. Configure gateway groups (System → Routing → Gateway Groups) with priority order — primary at Tier 1, backup at Tier 2. Apply the gateway group to firewall rules instead of specific gateways.
Failover behavior: if the primary gateway becomes unreachable (failed pings to a monitor IP like 8.8.8.8), pfSense routes new connections through the backup. Existing connections may break (client TCP connections need to reconnect through the new path). Failover detection takes 5-30 seconds depending on configuration.
For load balancing rather than failover: configure both gateways at Tier 1. New connections distribute across both gateways. Useful for users wanting aggregate bandwidth from two slower connections, but adds complexity.
Snapshots and Recovery
If you installed pfSense with ZFS (the default since 2.5.x), filesystem snapshots provide instant rollback. Diagnostics → Backup & Restore → ZFS Snapshots. Take a snapshot before major changes; if the change breaks something, roll back instantly.
This is invaluable when experimenting with complex configurations. Adding pfBlockerNG with aggressive feeds, deploying Suricata for the first time, or major firewall rule restructuring — snapshot first, change second, rollback if needed.
Combined with config backups (covered above) and HA (for users running it), snapshots provide multiple layers of recovery. The combined approach: snapshot before risky changes, automated backups for regular protection, HA for production reliability.
Frequently Asked Questions
What hardware do I need for pfSense?
Any x86 mini PC with 2+ network ports and 4GB+ RAM. Common choices: Protectli Vault (purpose-built, $300-700), Topton N100 mini PCs ($150-300), or repurposed thin clients ($50-150). For gigabit fiber with IDS, choose Topton N100 or higher; for slower connections, even Celeron-based mini PCs work fine.
Is pfSense really free?
Yes, pfSense Community Edition (pfSense CE) is fully free and open-source. Netgate sells pfSense Plus (commercial version with paid support) but pfSense CE has every feature most users need. Some packages (Snort VRT rules, certain commercial integrations) require paid subscriptions, but the core platform is free.
Can pfSense replace my consumer router?
Yes, fully. pfSense replaces every consumer router function (NAT routing, DHCP, DNS, firewall, port forwarding, dynamic DNS) with enterprise-grade equivalents. The setup is more complex than plug-and-play consumer routers but the resulting network is dramatically more capable and secure.
How long does pfSense setup take?
Initial functional setup: 1-2 hours. Production-ready with VPN, IDS, VLANs, and security rules: 8-15 hours of learning and configuration. Full mastery (advanced features, optimization, multi-WAN failover): 50+ hours of accumulated experience. The basics are achievable in a weekend; the depth takes months.
Does pfSense work on Raspberry Pi?
Not officially. pfSense is x86-only. The closest equivalent on Raspberry Pi is OpenWrt, which runs on ARM. For users specifically wanting Pi-based routing, OpenWrt is the right choice. For users running x86 mini PCs, pfSense is the better answer.
What’s the difference between pfSense CE and pfSense Plus?
pfSense CE is free and open-source; pfSense Plus is Netgate’s commercial version with paid support, additional packages, and faster security updates. For home users and most small businesses, CE is sufficient. Plus is sold for organizations needing commercial support contracts.
Can pfSense handle gigabit internet?
Yes, with adequate hardware. Basic NAT routing on gigabit fiber needs only 1-2GHz of CPU. Adding IDS (Suricata) and VPN at gigabit speeds requires more capable hardware — Topton N100 or higher. Older hardware (Atom processors, single-core x86) caps at 200-500 Mbps under load.